

Building a WordPress Website from Scratch: A Step-by-Step Guide
Read our step-by-step guide on building A WordPress Website From Scratch and build your own website from zero to online in one weekend.

Building a WordPress website from scratch may seem daunting, especially if it’s your first time diving into the world of websites. But don’t worry; we’ve got you covered! In this blog post, we’ll walk you through the entire process, from choosing a domain and hosting to customizing your theme and plugins. Let’s get started!
Step 1: Choose a Domain

Choosing the right domain name and hosting provider is essential for the success of your website. A domain name is your online address while hosting is the service that stores and serves your website files. Making informed decisions in these areas will improve your website’s user experience and performance.
Domain
A domain is the unique address users type into their web browsers to access your website. Choosing a domain name that is easy to remember, pronounce, and represents your brand or business is crucial.
Factors to consider:
- Domain Extension: Top-level domains (TLDs) such as .com, .org, .net, and country-code TLDs (ccTLDs) like .co.uk or .de hold different implications for your website. The .com extension is the most popular and recognized worldwide. However, other extensions might be more suitable depending on your target audience or business type (source: Verisign Domain Name Industry Brief).
- Brandability: Make sure your domain name represents your brand, is memorable, and easy to spell. Avoid using hyphens, numbers, or confusing words (source: Moz’s Guide to Choosing a Domain Name).
- Availability: Check domain availability using domain registrars like Namecheap or GoDaddy. If your desired domain is taken, consider alternative extensions or slight variations in the name.
NameCheap
For domain registration, consider Namecheap, which offers various domain extensions at competitive prices. Namecheap is known for its excellent customer service and easy-to-use domain management tools, earning a reputation as one of the top domain registrars.
Hosting

A web hosting service provides storage space and resources for your website files. Choosing the right hosting provider ensures optimal website performance, security, and reliability.
Factors to consider:
- Type of Hosting: Shared hosting, virtual private server (VPS) hosting, dedicated server hosting, and cloud hosting are the primary types of hosting services available. Shared hosting is the most affordable option but might not provide adequate resources for high-traffic websites. VPS and dedicated hosting offer more resources and control, while cloud hosting provides scalability and performance advantages (source: WebsiteSetup’s Guide to Web Hosting).
- Performance and Uptime: Reliable hosting providers should offer at least 99.9% uptime, ensuring your website is accessible to visitors most of the time. High-performance hosting can also improve your website’s loading speed, improving experience, and search engine rankings (source: Google’s Page Experience Update).
- Customer Support: Choose a hosting provider with excellent customer support available through various live chat, phone, or email channels.
- Security: Ensure your hosting provider offers adequate security measures, such as SSL certificates, regular backups, and malware protection.
- Price: Compare hosting plans and their features to find the best fit for your budget. Remember that some providers offer introductory discounts that may increase upon renewal.
SiteGround
SiteGround is a widely recommended hosting provider known for its speed, security, and customer support. It offers a variety of hosting options, including shared, cloud, and dedicated hosting. SiteGround is officially recommended by WordPress, Joomla, and Drupal, highlighting its compatibility with major content management systems. SiteGround’s hosting plans include advanced features like free SSL certificates, daily backups, and a content delivery network (CDN) to improve site performance.
Cloudways
Cloudways is a managed cloud hosting provider known for its flexibility and scalability. It offers managed hosting on top cloud infrastructures, including DigitalOcean, Linode, Vultr, AWS, and Google Cloud Platform. Cloudways’ unique platform allows users to customize their hosting environment easily, enabling them to scale resources on demand. With features like built-in caching, real-time monitoring, and free SSL certificates, Cloudways ensures optimal website performance and security.
Step 2: Install WordPress
Once you’ve secured your domain and hosting, installing WordPress is time. Most hosting providers offer a user-friendly interface, allowing you to install WordPress with just a few clicks through their control panel.
a) Using one-click installer: Use your web host’s one-click installer (e.g., Softaculous, Fantastico). (Source: https://www.wpbeginner.com/how-to-install-wordpress/)
b) Manually: Download WordPress from https://wordpress.org/download/, upload files using FTP, create a MySQL database, run the WordPress installation script. (Source: https://www.wpbeginner.com/how-to-install-wordpress/)
Check out this video tutorial for a step-by-step walkthrough.
Step 3: Choose a Theme

With WordPress installed, your next step is selecting a theme for your website. Head over to the admin dashboard and navigate to Appearance → Themes. There, you’ll find a vast library of free and premium themes to choose from. You can also browse through Thrive Theme Builder for more template options.
1. Determine your website goals: Reflect on your website’s purpose and target audience. Consider the design, layout, and features you want to include (e.g., blog, portfolio, e-commerce).
2. Define your theme preferences: List desirable theme features, like responsive design, color schemes, typography, and customization options.
3. Browse theme repositories: Visit trusted websites like the official WordPress Theme Directory (https://wordpress.org/themes/), Envato Market (https://themeforest.net/), or ThemeIsle (https://themeisle.com/wordpress-themes/).
4. Filter and search: Use search filters based on features, categories, and other criteria to narrow your choices.
5. Examine theme ratings and reviews: Look for user feedback and average ratings on the theme repository sites or forums.
6. Ensure compatibility with plugins: Check theme documentation or consult the developer to verify compatibility with essential plugins you intend to use.
7. Analyze theme support and documentation: Choose a theme with clear documentation and a dedicated support team to help with updates and troubleshooting.
Consider building a child theme or choosing a premium theme for advanced features and designs for a more customized look.
Step 4: Customize Your Theme

With your theme selected, it’s time to make it your own!
- Log in to your WordPress dashboard: Navigate to your website’s admin area by entering your site’s domain followed by “/wp-admin” (e.g., “www.example.com/wp-admin”). Enter your login credentials.
- Access the Appearance menu: On the left side, click “Appearance.”
- Choose a theme: Click “Themes” and browse the available themes. You can preview a theme by clicking “Live Preview” and install it by clicking “Install.” Activate your chosen theme by clicking “Activate.” Source: WordPress Codex, https://codex.wordpress.org/Using_Themes
- Customize theme settings: Click on “Customize” under the Appearance menu to access the theme customizer. This will display various options to customize your theme’s appearance, such as colors, typography, layout, and more. Source: WordPress Customizer Overview, https://developer.wordpress.org/themes/customize-api/customizer-objects/
- Edit site title and tagline: Under “Site Identity” in the customizer, edit your site title and tagline. Click “Publish” to save the changes. Source: WordPress Codex, https://codex.wordpress.org/Settings_General_Screen
- Update colors and background: Go to “Colors & Background” in the customizer to adjust the site’s color scheme and background. Click “Publish” to save the changes. Source: WordPress Customizer, https://developer.wordpress.org/themes/customize-api/customizer-objects/
- Customize fonts and typography: Depending on your theme, there may be an option in the customizer for “Typography” or “Fonts.” Edit the font styles and sizes as desired. Click “Publish” to save the changes.
Take a look at this blog post for more inspiration on customizing your theme.
Step 5: Install Plugins
Plugins are essential tools that enhance your WordPress website’s functionality and user experience.
- Log in to your WordPress Admin Dashboard: Access your WordPress admin area by going to “https://yourdomain.com/wp-admin” (replace “yourdomain.com” with your actual domain name) and enter your login credentials.
- Navigate to the “Plugins” tab: Once logged in, locate the “Plugins” tab in the left-hand menu.
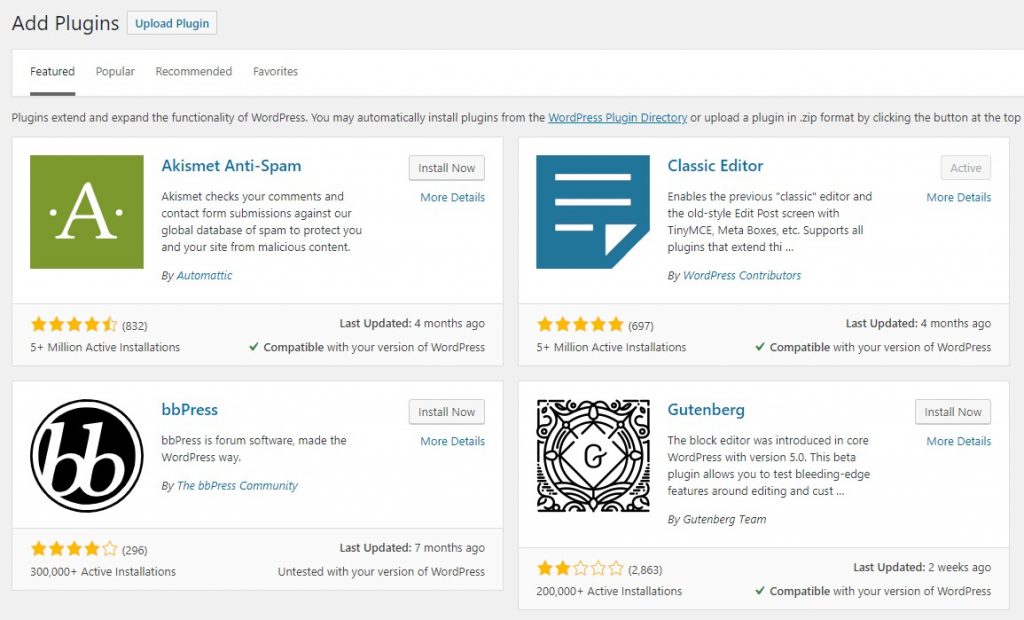
- Click “Add New”: On the Plugins page, click the “Add New” button at the top of the page. This will take you to the WordPress Plugin Repository.
- Search for the desired plugin: Use the search bar in the top right corner of the “Add Plugins” page to search for the plugin you want to install.
- Click “Install Now”: Find the desired plugin in the search results, and click the “Install Now” button. The plugin’s files will be downloaded and installed automatically. (Source: WordPress.org, https://wordpress.org/support/article/managing-plugins/#installing-plugins)
- Activate the plugin: After the installation is complete, click the “Activate” button which appears in place of the “Install Now” button. This will activate the plugin, making it ready to use. (Source: WordPress.org, https://wordpress.org/support/article/managing-plugins/#activating-plugins)
- Configure the plugin (if necessary): Some plugins may require additional configuration. If this is the case, follow the plugin’s documentation for setup instructions. You may find the plugin’s settings under the “Settings” tab or as a separate tab in the WordPress admin menu.
Some recommended plugins include Yoast SEO for search engine optimization, W3 Total Cache for improved site performance, and Google Analytics for tracking website traffic.
This list will help you identify some of the best SEO plugins available.
Step 6: Create Pages and Menus
Now that your website is taking shape, it’s time to create your pages and menus. Start by adding essential pages like Home, About, Services, and Contact to your website.
Creating Pages and Menus in WordPress involves the following steps:
Creating Pages:
a. Log in to your WordPress dashboard.
b. Click on Pages > Add New from the sidebar menu.
c. Enter a title for the page.
d. Add desired content using the block editor.
e. Set page attributes, such as template and parent (if needed).
f. Click Publish when done. Source: WordPress.org – Writing Posts
Creating Menus:
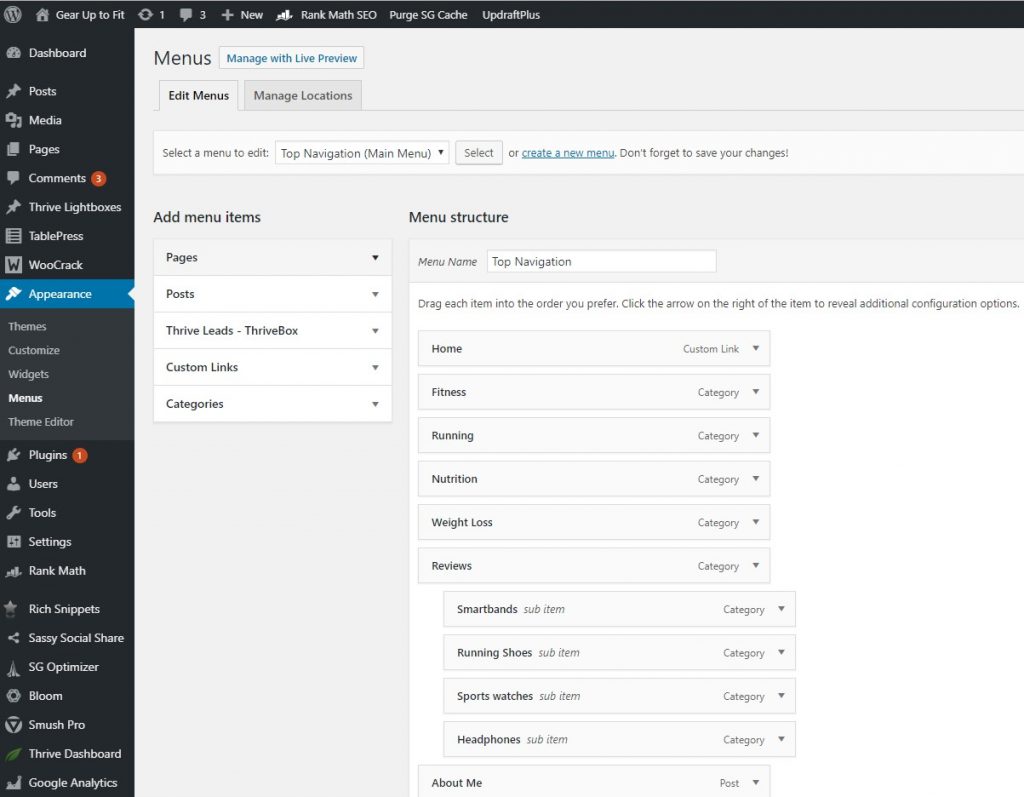
a. Go to Appearance > Menus in the WordPress dashboard.
b. Click on “create a new menu,” give it a name, and click “Create Menu.”
c. Add items (Pages, Posts, Categories, etc.) by selecting them and clicking “Add to Menu.”
d. Arrange menu items by dragging and dropping them into the desired order.
e. Set menu location (e.g., Primary Menu, Footer Menu) depending on your theme.
f. Click “Save Menu” to apply changes. Source: WordPress.org – Navigation Menus
Both processes involve using the WordPress dashboard to create and manage content. I recommend visiting the official WordPress documentation (https://wordpress.org/support/) for more in-depth information.
Don’t forget to include a contact form on your Contact page, which you can create with plugins like Contact Form 7 or WPForms.
Next, create your menu by navigating to Appearance → Menus in your admin dashboard. From there, you can add your pages to your menu and arrange them in your desired order. You can also create additional menus for other sections of your website, like a blog or resources page.
For more information on creating pages and menus, check out this guide.
Step 7: Optimize for Mobile Devices

With more users accessing websites on mobile devices, ensuring your site looks great and functions well on smaller screens is crucial. Many themes come with built-in responsive designs, but double-checking your site’s appearance on various screen sizes is always a good idea.
Choose a responsive theme: Select a theme that automatically adjusts its layout for different screen sizes. Many WordPress themes are already responsive, but check the theme’s description to ensure mobile compatibility. (Source: WordPress.org Themes)
Use a mobile plugin: Install a plugin like WPtouch, Jetpack, or WordPress Mobile Pack to create a mobile-friendly version of your site. These plugins automatically optimize your website for mobile devices, improving user experience. (Source: WPtouch, Jetpack, WordPress Mobile Pack)
Optimize images: Compress and resize images using plugins like WP Smush, EWWW Image Optimizer, or ShortPixel Image Optimizer. Optimizing images reduces page load times and enhances the mobile user experience. (Source: WP Smush, EWWW Image Optimizer, ShortPixel Image Optimizer)
Minify and combine CSS and JavaScript files: Utilize plugins like Autoptimize, W3 Total Cache, or WP Rocket to minify and combine CSS and JavaScript files. This reduces the number of HTTP requests and improves overall site performance. (Source: Autoptimize, W3 Total Cache, WP Rocket)
Enable caching: Implement caching to store static versions of your site’s content to reduce server load and improve page load times. Use plugins like W3 Total Cache, WP Super Cache, or WP Rocket to enable caching on your website. (Source: W3 Total Cache, WP Super Cache, WP Rocket)
Use a Content Delivery Network (CDN): Implement a CDN like Cloudflare, Amazon CloudFront, or MaxCDN to distribute your static content (images, CSS, JavaScript) across multiple servers. This reduces latency and improves load times for mobile users. (Source: Cloudflare, Amazon CloudFront)
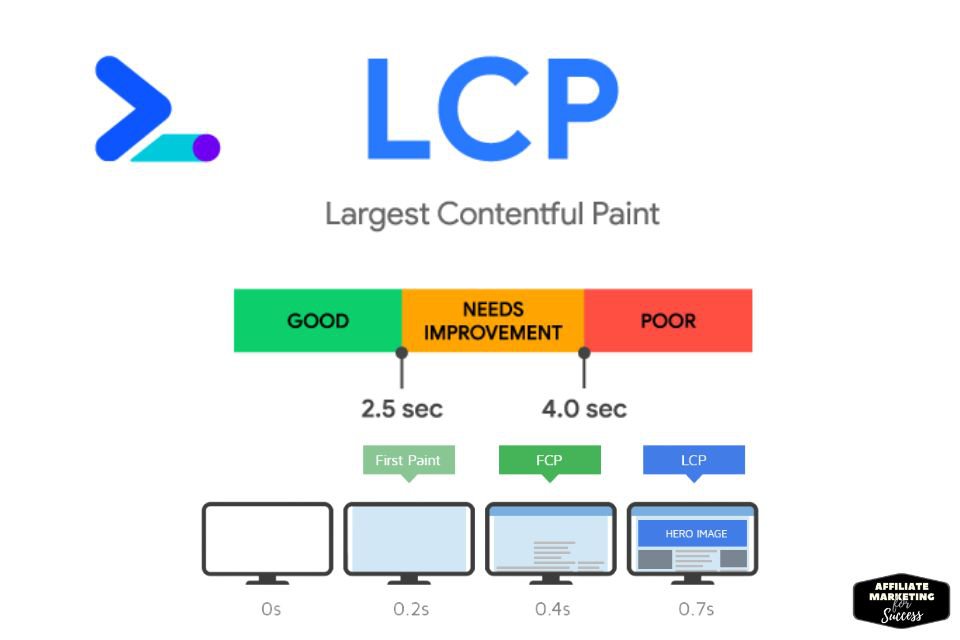
WPRocket
Is your WordPress site loading slowly on mobile devices? This can frustrate your visitors and hurt your SEO rankings. WPRocket is the best plugin to fix mobile speed issues and boost your site’s performance. WPRocket leverages powerful yet easy-to-use optimizations to speed up your mobile pages by up to 80%. By optimizing database queries, CSS/JS files, images, and caching, WPRocket makes your entire site lightning-fast on mobile. And you can see the impact with clear before/after reports. If you want a faster, higher-converting mobile experience, install the top-rated WPRocket plugin today.
Step 8: Launch Your Website and Monitor Performance
It’s finally time to launch your website! But launching isn’t the end of the process; monitoring your site’s performance and making improvements as needed is essential. Use tools like Google Analytics to track your website traffic and Google Search Console to monitor your search engine rankings.
Step 10: Start creating content

The final step is to start creating the content for your website. You can write blog posts and pages and add images/media through the WordPress admin dashboard.
Plan Your Content Strategy
- Define your target audience.
- Decide on a content format.
- Create an editorial calendar, including:
- The topics you’ll cover in each piece of content and the order in which they’ll be published (e.g., “First, we’ll write about X; then Y; then Z.”).
- When each piece will go live (e.g., “Our first post will be published on Tuesday, June 19th at 10am EST.”), this is especially important if you have multiple contributors who may not all be able to post simultaneously or if other factors affect when posts should go live (such as seasonal events).
Copy.ai
Copy.ai is an AI-powered assistant that makes creating original content on demand easy. With Copy.ai, you enter a few keywords or prompts about the type of content you need, and the assistant instantly produces draft content for your review. Whether you need blog ideas, email copy, or ad messages, Copy.ai has you covered. The content drafting is fast, affordable, and tailored to your needs. If you’re struggling with writer’s block or want to be more efficient with your content creation, let Copy.ai be your AI-powered creative partner.
FAQs
What are the initial steps to create a WordPress website from scratch?
How to choose a WordPress theme?
What are the essential plugins for a WordPress website?
How to optimize a WordPress website for SEO?
How to secure a WordPress website?
Conclusion
Regularly update your content, plugins, and themes to maintain a secure and optimized website. Continuously look for ways to improve user experience, and don’t be afraid to make changes based on user feedback and analytics data.
With this step-by-step guide, you’ll be well on your way to building a successful WordPress website from scratch. Good luck, and happy website building!
References
WordPress.com guide to building a website from scratch: https://wordpress.com/go/website-building/how-to-build-a-website-from-scratch-with-wordpress-com-in-10-steps/
GoDaddy’s step-by-step guide to building a WordPress website: https://www.godaddy.com/garage/how-to-build-a-wordpress-website-for-the-first-time/
WP Support Desk’s guide on how to build a WordPress website: https://wpsupportdesk.com/blog/how-to-build-a-wordpress-website/
HostingAdvice.com article on how to make a website: https://www.hostingadvice.com/how-to/how-to-make-a-website/
WPBeginner.com tutorial on how to make a WordPress website: https://www.wpbeginner.com/guides/
WPExplorer.com guide on how to create a WordPress website: https://www.wpexplorer.com/wordpress-website-from-scratch/
ThemeIsle.com beginner’s guide to building a WordPress website: https://themeisle.com/blog/how-to-make-a-website-from-scratch/
DreamHost.com step-by-step guide on how to build a WordPress website: https://www.dreamhost.com/wordpress/guide-to-building-your-first-wordpress-site/
WPForms.com guide on how to create a custom WordPress website: https://wpforms.com/how-to-create-a-custom-wordpress-website-from-scratch/
WPKube.com guide on how to make a WordPress website: https://www.wpkube.com/how-to-make-a-wordpress-website/
WPShout.com tutorial on how to build a WordPress website: https://wpshout.com/how-to-build-a-wordpress-website-from-scratch/
HostingAdvice.com article on how to build a WordPress website: https://www.hostingadvice.com/how-to/build-a-wordpress-website/
ElegantThemes.com guide on how to build a WordPress website: https://www.elegantthemes.com/blog/resources/how-to-build-a-wordpress-website-from-scratch
WPBeginner.com guide on how to make a WordPress website for beginners: https://www.wpbeginner.com/guides/
WPMUDEV.org comprehensive guide on how to create a WordPress website: https://premium.wpmudev.org/blog/how-to-create-a-wordpress-website-from-scratch/
WordPress.org – The official WordPress website is an excellent resource with documentation on installing and using WordPress. They have step-by-step guides and tutorials for beginners: https://wordpress.org/support/
WordPress.com has an excellent guide on how to build a website from scratch with WordPress, which includes ten steps to follow. “How to Build a Website From Scratch (Even With No Experience)” by WordPress.com
GoDaddy’s blog has a step-by-step guide on how to build a WordPress website for the first time, with seven steps to follow. https://www.godaddy.com/garage/how-to-build-a-wordpress-website-for-the-first-time/
WP Support Desk has a detailed guide on how to build a WordPress website from scratch, with chapters covering topics like getting a domain name, purchasing a hosting account, and installing WordPress. https://wpsupportdesk.com/blog/how-to-build-a-wordpress-website/
HostingAdvice.com has an article that covers different ways to make a website from scratch, including using WordPress or building a site with basic HTML. https://www.hostingadvice.com/how-to/how-to-make-a-website/
WPBeginner.com has an easy tutorial on how to make a WordPress website, with free tools like a business name generator and a WordPress theme detector. https://www.wpbeginner.com/guides/
“How to Make a WordPress Website in 2023 (Ultimate Guide)” by WPBeginner
I’m Alexios Papaioannou, an experienced affiliate marketer and content creator. With a decade of expertise, I excel in crafting engaging blog posts to boost your brand. My love for running fuels my creativity. Let’s create exceptional content together!